ラベル CentOS の投稿を表示しています。 すべての投稿を表示

2016年9月5日月曜日

CentOS logrotateでエラー

先日CentOS6.8、Apache+PHP+PostgreSQLを構築した。OSはテキストモード、アプリはソースからインストール。

構築後の週明け月曜日にこんなメールが・・・

------------------------------------
表題:Anacron job 'cron.daily' on xxxxx.jp
------------------------------------

本文:
/etc/cron.daily/logrotate:

syslogd: no process killed
error: error running shared postrotate script for '/var/log/postgresql.log '

------------------------------------

PostgreSQLのログは/var/log/でconfは以下の通り

#vi /etc/rsyslog.conf
#追記

# Save PostgreSQL to postgresql.log
local0.* /var/log/postgresql.log


ログファイルのローテーション設定は以下の通り

# vi /etc/logrotate.d/postgresql

/var/log/postgresql.log {
rotate 12
weekly
missingok
sharedscripts
postrotate
/usr/bin/killall -HUP syslogd
endscript
}


あ、CentOS6.8・・・syslogdじゃなくてrsyslogdだ!
※6.4よりrsyslogがデフォルト

/var/log/postgresql.log {
rotate 12
weekly
missingok
sharedscripts
postrotate
/usr/bin/killall -HUP rsyslogd
endscript
}

これで無事解決(^^)

2013年10月18日金曜日

SpeeVer VPS Linux(Plesk Panelなし) 初期設定

さ○らインターネットのVPSは情報が豊富だがこのSpeeVerに関しては情報が乏しい・・・たまたまSpeeVerのVPS(CentOS6)を使う機会があったため記録に残しておきます。

特徴

  • 仮想環境はParallels Virtuozzoを採用している
  • OSはCentOS, Dabian, Ubuntuから選択が可能(申込みの段階で決める)
  • ルート権限を与えてもらえる(実際はroot権限に近い権限のようです)
  • グローバルIPはデフォルトで1個付与される(追加が可能)
  • データ転送量は無制限
  • IDS/IPSが標準搭載、24時間有人監視あり
  • データセンターは国内にある
  • サポート用の電話連絡先がある(月~金 9:00~19:00)
  • 初心者にもやさしい管理ツール「Plesk Panel」がある(今回は契約なし)
  • 2013/09/11~2013/12/10キャンペーンがある(月額が最大半額に)
  • その他有料オプションあり
  • 自前で用意したOSのインストールはできない

契約したプラン

  • VS-31 CentOS 6 x86_64 (Pleskなし)
    • 初期費用 5,250円
    • 契約期間 12ヶ月
    • 月額料金 キャンペーンにより12か月間は4,200円→2,100円
    • CPU4コア(Intel(R) Xeon(R) CPU X5570 2.93GHz)
    • メモリ 2GB
    • HDD 200GB
    • Pleskなしのため最少インストールに近い(httpdはインスト済状態でした)
    • VPSの初期化は有料(2,100円) ※新しいVPSが作られ古い方が契約解除

使用目的

  • Apache+PHP+PostgreSQLでWebアプリ(200名程度の会員限定サイト)
  • 原則としてWebやDBすべてソースからインストールする

ネットワーク状態等の確認

まずはSSHクライアント(Poderosa)を使用してrootでログインして状態の確認
  • uname -a
    • Linux vps-*******-***.cp.hosting-srv.net 2.6.32-042stab079.5 #1 SMP Fri Aug 2 17:16:15 MSK 2013 x86_64 x86_64 x86_64 GNU/Linux
  • /etc/hosts
    • 127.0.0.1   localhost localhost.localdomain localhost4 localhost4.localdomain4
    • ::1         localhost localhost.localdomain localhost6 localhost6.localdomain6
    • # Auto-generated hostname. Please do not remove this comment.
    • ***.***.***.*** vps-*******-***.cp.hosting-srv.net vps-*******-***
  • /etc/resolv.conf
    • nameserver 210.152.143.70
    • nameserver 210.152.143.114
  • /etc/sysconfig/network
    • NETWORKING="yes"
    • NETWORKING_IPV6="yes"
    • HOSTNAME="vps-*******-***.cp.hosting-srv.net"
  • /etc/sysconfig/network-scripts/ifcfg-venet0
    • DEVICE=venet0
    • BOOTPROTO=static
    • ONBOOT=yes
    • IPADDR=127.0.0.1
    • NETMASK=255.255.255.255
    • BROADCAST=0.0.0.0
    • ARPCHECK="no"
    • GATEWAYDEV="venet0"
    • IPV6INIT="yes"
    • IPV6_DEFAULTDEV="venet0"
  • /etc/sysconfig/network-scripts/ifcfg-venet0:0
    • DEVICE=venet0:0
    • ONBOOT=yes
    • IPADDR=***.***.***.***
    • NETMASK=255.255.252.0
  • chkconfig --list
    • crond           0:off   1:off   2:on    3:on    4:on    5:on    6:off
    • htcacheclean    0:off   1:off   2:off   3:off   4:off   5:off   6:off
    • httpd           0:off   1:off   2:off   3:on    4:off   5:off   6:off
    • iptables        0:off   1:off   2:on    3:on    4:on    5:on    6:off
    • modules_dep     0:off   1:off   2:on    3:on    4:on    5:on    6:off
    • named           0:off   1:off   2:off   3:off   4:off   5:off   6:off
    • netconsole      0:off   1:off   2:off   3:off   4:off   5:off   6:off
    • netfs           0:off   1:off   2:off   3:off   4:on    5:on    6:off
    • network         0:off   1:off   2:on    3:on    4:on    5:on    6:off
    • nmb             0:off   1:off   2:off   3:off   4:off   5:off   6:off
    • nscd            0:off   1:off   2:off   3:off   4:off   5:off   6:off
    • portreserve     0:off   1:off   2:on    3:off   4:on    5:on    6:off
    • quota_nld       0:off   1:off   2:off   3:off   4:off   5:off   6:off
    • rdisc           0:off   1:off   2:off   3:off   4:off   5:off   6:off
    • restorecond     0:off   1:off   2:off   3:off   4:off   5:off   6:off
    • rpcbind         0:off   1:off   2:on    3:off   4:on    5:on    6:off
    • rsyslog         0:off   1:off   2:on    3:on    4:on    5:on    6:off
    • saslauthd       0:off   1:off   2:off   3:on    4:off   5:off   6:off
    • sendmail        0:off   1:off   2:on    3:on    4:on    5:on    6:off
    • smb             0:off   1:off   2:off   3:off   4:off   5:off   6:off
    • snmpd           0:off   1:off   2:off   3:off   4:off   5:off   6:off
    • snmptrapd       0:off   1:off   2:off   3:off   4:off   5:off   6:off
    • sshd            0:off   1:off   2:on    3:on    4:on    5:on    6:off
    • udev-post       0:off   1:on    2:on    3:off   4:on    5:on    6:off
    • vzreboot        0:off   1:off   2:off   3:off   4:off   5:off   6:on
    • winbind         0:off   1:off   2:off   3:off   4:off   5:off   6:off
    • xinetd          0:off   1:off   2:off   3:on    4:on    5:on    6:off

OSの初期設定

■作業用の管理ユーザーの作成

# useradd hoge
# password hoge

hogeでログイン
$ su -
パスワード:********
#

■root宛てメールを転送

# cd /etc/
# vi aliases

一番下にある
# Person who should get root's mail
#root:          marc
root:           hoge@example.com   #追記

変更を確定
# newaliases

メールテスト
# mail root
Subject: test
test mail
.
EOT

※本文の最後としてピリオドが必要です。

■suコマンドでのsu制限(wheelグループ所属のみ許可)

hogeをwheelグループへ
# usermod -G wheel hoge

# vi /etc/pam.d/su
auth            required        pam_wheel.so use_uid #コメント解除

# vi /etc/login.defs
SU_WHEEL_ONLY yes #追記


■ipv6の無効化

# echo 1 > /proc/sys/net/ipv6/conf/default/disable_ipv6
# echo 1 > /proc/sys/net/ipv6/conf/all/disable_ipv6

# vi /etc/hosts
#::1 #コメントにする

■SSHの調整(例)

# vi /etc/ssh/sshd_config
ListenAddress 0.0.0.0          #コメント解除(ipv4のみ)
LoginGraceTime 20            #コメント解除(接続からログインまでの制限時間を20秒に設定)
PermitEmptyPasswords no  #コメント解除(パスワードなしでのログインは禁止)
PermitRootLogin no           #コメント解除(rootはログイン禁止)
AllowUsers hoge                #追記(ログインできるユーザーを限定)
#Port 22                          #コメントにする
Port 10022                      #追記(待ち受けポートを10022に変更)

※念のためPort22も残して22,10022両方で待ち受けしておき10022でのログインを確認できたら後で22をコメントにするのも良い(ここでログインできなくなると致命的→初期化の道へ)

書き込みが終わったところでnetwork,sshdをリスタート
# /etc/init.d/network restart
# /etc/init.d/sshd restart

再ログインの確認後スーパーユーザへ
$ su -
パスワード:********
#

■GPGキーのインポート

キーがインポートされているか確認
# rpm -qai gpg-pubkey*
何も表示されなければインポートされていません。

キーのインポート
# rpm --import http://mirror.centos.org/centos/RPM-GPG-KEY-CentOS-6;

再度キーの確認
# rpm -qai gpg-pubkey*
何やら暗号らしきものが表示されればOKです。

■RPM版httpdのアンインストール

ソースからインストールするので不要
# rpm -qa | grep httpd
httpd-tools-2.2.15-29.el6.centos.x86_64
httpd-2.2.15-29.el6.centos.x86_64

# rpm -e httpd-2.2.15 httpd-tools-2.2.15
警告: /etc/httpd/conf/httpd.conf は /etc/httpd/conf/httpd.conf.rpmsave として保存されました。

残骸(消してもいい)
# find / -name httpd
/var/log/httpd
/etc/httpd

# ls /var/log/httpd/
access_log  error_log

# ls /etc/httpd/conf/
httpd.conf.rpmsave

■グループパッケージの調整

# yum grouplist
-bash: yum: コマンドが見つかりません

あれ?
# rpm -qa | grep yum

ない!どうやらデフォルトでは使えないようです。

ということで、SpeeVerの管理サイトへ行きyumを使えるようにします。(https://cp.hosting-srv.net)
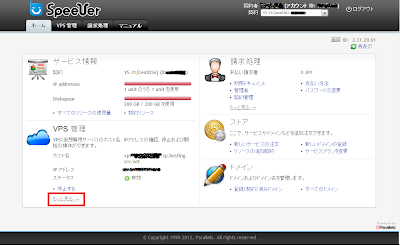


VPS管理→もっと見る

アプリケーションタブ

インストールするを選択

.ride_yum.centos-6-x86_64チェックON→設定する

インストールが完了

これでyumが使えるようになりましたので確認します。
# rpm -qa | grep yum
yum-metadata-parser-1.1.2-16.el6.x86_64
yum-3.2.29-40.el6.centos.noarch
yum-plugin-fastestmirror-1.1.30-14.el6.noarch

ということで、現在のパッケージ群がどのようになっているかチェック
# yum grouplist
Installed Groups: ←インストール済パッケージ群
   CIFS ファイルサーバー(CIFS file server)
   Perl のサポート(Perl Support)
   SNMP サポート(SNMP Support)
   コンソールインターネットツール(Console internet tools)
   システム管理ツール(System administration tools)
   ディレクトリサーバー(Directory Server)
   ディレクトリ接続クライアント(Directory Client)
   ネットワーキングツール(Networking Tools)
   ネットワークインフラストラクチャサーバー(Network Infrastructure Server)
   ネットワークファイルシステムクライアント(Network file system client)
   レガシー UNIX の互換性(Legacy UNIX compatibility)
   電子メールサーバー(E-mail server)

※インストール可能パッケージも表示されますがここでは割愛します。

使わない不要なパッケージグループは削除します。(任意)

samba系
# yum groupremove "CIFS file server"
# yum groupremove "Directory Client"

SNMP系
# yum groupremove "SNMP Support"

elinks系
# yum groupremove "Console internet tools"

必要なパッケージ群をインストールします。
ソースからインストールするためには開発パッケージ群は必須です。
# yum groupinstall base "Development Tools"

最終的には以下のパッケージ群となりました。
   Base
   Development tools
   E-mail server
   Graphical Administration Tools
   Hardware monitoring utilities
   Legacy UNIX compatibility
   Network Infrastructure Server
   Networking Tools
   Performance Tools
   Perl Support
   System administration tools


■不要サービスの停止

# service acpid stop
# service cpuspeed stop
# service haldaemon stop
# service ip6tables stop
# service kdump stop
# service messagebus stop
# service sysstat stop

自動起動を停止
# chkconfig acpid off
# chkconfig cpuspeed off
# chkconfig haldaemon off
# chkconfig ip6tables off
# chkconfig kdump off
# chkconfig messagebus off
# chkconfig sysstat off

/etc/logs/messegeにこんなログが大量に・・・irqbalanceにバグがあるようだ
irqbalance: WARNING, didn't collect load info for all cpus, balancing is broken

ということでとりあえず停止
# service irqbalance stop
# chkconfig irqbalance off

一応ここでサーバを再起動
# shutdown -r now

あれ?
SSH接続ができない・・・・・
PINGが通らない・・・・・

SpeeVerの管理サイトからVPNのステータスを見るとなんとエラーで起動されていない。
えーーーーーーっ!なんで?
FWもまだ設定してねーし何が原因?

とりあえずSpeeVerのサポートへ連絡
状況を説明したがエラー原因を調べることはできないとの回答
しまいには初期化をするしかないとのこと

ん~納得がいかない、原因がわからないのに初期化に金払えというのか!
そんなアホな、とりあえずすべての操作ログを送り調査して頂くことに・・・

翌日、サポートより正常に起動されているようですとメールあり
は?何じゃそりゃ!昨日はPINGすら通らなかったのに・・・

何かのバグで手を加えたんでしょうかねえ?

とりあえず使えるようになったので構築の続きを開始する。

■ファイアウォールの設定

ここはもっとも慎重に行う必要があります。
私自身ちょっとしたミスでSSH接続できなくなってしまったため初期化という悲しい道へ行ってしまいました。

iptablesを使いPING応答許可、10022ポート(SSH用)、5432ポート(PostgreSQL)、80ポート(Web)許可する。ただし10022と5432は特定IPからのみ許可とする。

SpeeVerのヘルプページでPostgreSQLのTCP/IP接続は出来ないとあるがPlesk Panelなしの今回の契約では接続可能でした。

/etc/sysconfig/iptablesに記述してもよいがスクリプトを作って実行した方が楽なのでスクリプトを作成して実行します。

# pwd
/root

新ファイルの作成
# vi myfilter.sh

#!/bin/sh
/sbin/iptables -F
/sbin/iptables -X

# 外部からをすべて遮断 /sbin/iptables -P INPUT DROP
/sbin/iptables -P OUTPUT ACCEPT
/sbin/iptables -P FORWARD DROP

/sbin/iptables -A INPUT -i lo -j ACCEPT
/sbin/iptables -A OUTPUT -o lo -j ACCEPT

/sbin/iptables -A INPUT -s 10.0.0.0/8 -j DROP
/sbin/iptables -A INPUT -s 172.16.0.0/12 -j DROP
/sbin/iptables -A INPUT -s 192.168.0.0/16 -j DROP

# セッション確立後は許可
/sbin/iptables -A INPUT -m state --state ESTABLISHED,RELATED -j ACCEPT

# PING応答は許可 /sbin/iptables -A INPUT -p icmp --icmp-type echo-request -j ACCEPT

# 10022, 5432は会社からのみ許可(***やxxxやvvvは自社のグローバルIPです)
/sbin/iptables -A INPUT -s ***.***.***.***/32 -p tcp --dport 10022 -j ACCEPT
/sbin/iptables -A INPUT -s xxx.xxx.xxx.xxx/32 -p tcp --dport 10022 -j ACCEPT
/sbin/iptables -A INPUT -s vvv.vvv.vvv.vvv/32 -p tcp --dport 10022 -j ACCEPT
/sbin/iptables -A INPUT -s ***.***.***.***/32 -p tcp --dport 5432 -j ACCEPT
/sbin/iptables -A INPUT -p tcp --dport 80 -j ACCEPT

# 一致する定義がないのもは拒否されたようなメッセージを返す
/sbin/iptables -A INPUT -j REJECT --reject-with icmp-host-prohibited

/etc/rc.d/init.d/iptables save
/sbin/service iptables restart

書込み後
# shmod 755 ./myfilter.sh
# sh ./myfilter.sh
iptables: Flushing firewall rules:                         [  OK  ]
iptables: Setting chains to policy ACCEPT: mangle filter   [  OK  ]
iptables: Unloading modules:                               [  OK  ]
iptables: Saving firewall rules to /etc/sysconfig/iptables:[  OK  ]
iptables: Applying firewall rules:                         [  OK  ]

保存された設定を確認
# cat /etc/sysconfig/iptables
# Generated by iptables-save v1.4.7 on Tue Oct 22 11:11:08 2013
*mangle
:PREROUTING ACCEPT [55002:15509187]
:INPUT ACCEPT [55002:15509187]
:FORWARD ACCEPT [0:0]
:OUTPUT ACCEPT [52160:24383517]
:POSTROUTING ACCEPT [52160:24383517]
COMMIT
# Completed on Tue Oct 22 11:11:08 2013
# Generated by iptables-save v1.4.7 on Tue Oct 22 11:11:08 2013
*filter
:INPUT DROP [0:0]
:FORWARD DROP [0:0]
:OUTPUT ACCEPT [1:140]
-A INPUT -i lo -j ACCEPT
-A INPUT -s 10.0.0.0/8 -j DROP
-A INPUT -s 172.16.0.0/12 -j DROP
-A INPUT -s 192.168.0.0/16 -j DROP
-A INPUT -m state --state RELATED,ESTABLISHED -j ACCEPT
-A INPUT -p icmp -m icmp --icmp-type 8 -j ACCEPT
-A INPUT -s ***.***.***.***/32 -p tcp -m tcp --dport 10022 -j ACCEPT
-A INPUT -s xxx.xxx.xxx.xxx/32 -p tcp -m tcp --dport 10022 -j ACCEPT
-A INPUT -s yyy.yyy.yyy.yyy/32 -p tcp -m tcp --dport 10022 -j ACCEPT
-A INPUT -s ***.***.***.***/32 -p tcp -m tcp --dport 5432 -j ACCEPT
-A INPUT -p tcp -m tcp --dport 80 -j ACCEPT
-A INPUT -j REJECT --reject-with icmp-host-prohibited
-A OUTPUT -o lo -j ACCEPT
COMMIT
# Completed on Tue Oct 22 11:11:08 2013

実行状態の確認
# iptables -L

■システムの言語を変更(任意)

日本語の方が良ければ変更する必要なし
# vi /etc/sysconfig/i18n
#LANG="ja_JP.UTF-8" #コメント
LANG="en_US.UTF-8" #追記

■Logwatch

忘れてた!
CentOS6ではデフォルトインストールされていなかった

# yum install logwatch
Installed:
  logwatch.noarch 0:7.3.6-49.el6

Dependency Installed:
  perl-Date-Manip.noarch 0:6.24-1.el6
  perl-YAML-Syck.x86_64 0:1.07-4.el6

Complete!

■yumによる自動更新(任意)

yum-cronを使います。

# yum install yum-cron yum-plugin-downloadonly
Installed:
  yum-cron.noarch 0:3.2.29-40.el6.centos
  yum-plugin-downloadonly.noarch 0:1.1.30-14.el6

yumによる自動更新を起動
# /etc/init.d/yum-cron start

起動時に有効になるようにする
# chkconfig yum-cron on

起動設定の確認
# chkconfig --list yum-cron
※以下のようになっているか確認(2,3,4,5がon)
 yum-cron        0:off   1:off   2:on    3:on    4:on    5:on    6:off

■終わり

とりあえずOSの初期設定についてはこんなもんでしょう。
最後に再起動して状態をチェックします。
 
次はApache, PostgreSQL, PHPのインストールをしていきます。
 

2013年5月8日水曜日

Redmine2.3.1へアップグレード

以前構築した2.3.0を2.3.1へアップグレードした。

環境は以下の通り(Web,DB,Rubyはソースからインストール)

  • OS:CentOS 6.4(32bit)
  • Web:Apache 2.2.4(/usr/local/apache)+Passenger実行
  • DB:PostgreSQL 9.2.3(/usr/local/pgsql)
  • Ruby:1.9.3-p392
  • Redmine:/home/redmine/public_html (tarボールから)
環境の構築はこちら

バージョンアップの注意!
Redmine2.3.1よりpg-1.15.1(2.3.0では1.15.0であった)が必要となるため事前にアップしておきます。忘れるとbundle install 時、以下のエラーとなります。

エラー内容
An error occurred while installing pg (0.15.1), and Bundler cannot continue.
Make sure that `gem install pg -v '0.15.1'` succeeds before bundling.
[root@localhost public_html]# gem install pg -v '0.15.1'
Building native extensions.  This could take a while...
ERROR:  Error installing pg:
        ERROR: Failed to build gem native extension.


libpq-fe.h headerが見つけられるようpg_configへのパスを指定してpgをインストールします。
※with-pg-configはサーバ環境に合わせます。

# gem install pg -v '0.15.1' -- --with-pg-config=/usr/local/pgsql/bin/pg_config --no-rdoc --no-ri

Fetching: pg-0.15.1.gem (100%)
Building native extensions.  This could take a while...
Successfully installed pg-0.15.1
1 gem installed
Installing ri documentation for pg-0.15.1...
Installing RDoc documentation for pg-0.15.1...


もしエラーになる場合は以下のようにすれば大丈夫かも
# gem install pg -v '0.15.1' -- --with-pg-config=/usr/local/pgsql/bin/pg_config --with-pg-dir=/usr/local/pgsql/ --with-pg-lib=/usr/local/pgsql/lib/ --with-pg-include=/usr/local/pgsql/include/ --no-rdoc --no-ri


あれ?ドキュメントは不要とオプション指定しているのにインストールされてるような・・・まっいいや

ちなみにパスが正しく通っていないと以下のようにエラーとなります。

エラー内容
# gem install pg -v '0.15.1'
Building native extensions.  This could take a while...
ERROR:  Error installing pg:
        ERROR: Failed to build gem native extension.

        /usr/local/bin/ruby extconf.rb
checking for pg_config... no
No pg_config... trying anyway. If building fails, please try again with
 --with-pg-config=/path/to/pg_config
checking for libpq-fe.h... no
Can't find the 'libpq-fe.h header
*** extconf.rb failed ***
Could not create Makefile due to some reason, probably lack of
necessary libraries and/or headers.  Check the mkmf.log file for more
details.  You may need configuration options.
(ヘッダ情報が不足しておりMakefileが作れない、詳しくはmkmf.logを参照)

Provided configuration options:
        --with-opt-dir
        --without-opt-dir
        --with-opt-include
        --without-opt-include=${opt-dir}/include
        --with-opt-lib
        --without-opt-lib=${opt-dir}/lib
        --with-make-prog
        --without-make-prog
        --srcdir=.
        --curdir
        --ruby=/usr/local/bin/ruby
        --with-pg
        --without-pg
        --with-pg-dir
        --without-pg-dir
        --with-pg-include
        --without-pg-include=${pg-dir}/include
        --with-pg-lib
        --without-pg-lib=${pg-dir}/lib
        --with-pg-config
        --without-pg-config
        --with-pg_config
        --without-pg_config

Gem files will remain installed in /usr/local/lib/ruby/gems/1.9.1/gems/pg-0.15.1 for inspection.
Results logged to /usr/local/lib/ruby/gems/1.9.1/gems/pg-0.15.1/ext/gem_make.out
となってしまいます。


インストールを確認
# gem list --local
pg (0.15.1, 0.15.0)のように0.15.1を確認します。


では、アップグレード開始です。

2013年3月27日水曜日

CentOS6にRedmine2.3&PostgreSQL9.2

Redmine+PosgtreSQL+Apache+Passenger
  • Redmine:2.3.0
  • OS:  CentOS-6.4(x86) Minimal構成
  • Web: Apache-2.2.24(ソースから) Passenger実行
  • DB:  PostgreSQL-9.2.3(ソースから)
  • Ruby: Ruby1.9.3-p392(ソースから)
  • Rails: 3.2.13(Ruby同梱)

●OSのインストール

ここでは構築手順を割愛させて頂きますが以下で構築したものをベースにしております。
CentOS6をVMwareにテキストモードでインストールしたもので参考になるかと思います。
http://stdman.blogspot.jp/2011/12/centos6.html

構成内容(
・IPv6:OFF
・パッケージ群:Base,Development Tools
・有効サービス:crond,iptables,network,ntpd,postfix,rsyslog,sshd,cpuspeed,irqbalance
・FireWall:OFF
・SELinux:OFF

●必要パッケージやリポジトリをインストール

Rubyのビルドで必要なEPELリポジトリのインストール
http://ftp.riken.jp/Linux/fedora/epel/6/i386/repoview/epel-release.htmlからRPMのダウンロード先リンクを取得します。
 
# rpm -Uvh http://ftp.riken.jp/Linux/fedora/epel/6/i386/epel-release-6-8.noarch.rpm

Retrieving http://ftp.riken.jp/Linux/fedora/epel/6/i386/epel-release-6-8.noarch.rpm
warning: /var/tmp/rpm-tmp.ZZztWP: Header V3 RSA/SHA256 Signature, key ID 0608b895: NOKEY
Preparing...                ########################################### [100%]
   1:epel-release           ########################################### [100%]

EPELレポジトリのGPGキーのインポート
# rpm --import http://dl.fedoraproject.org/pub/epel/RPM-GPG-KEY-EPEL-6
 
EPELレポジトリのGPGキーの確認
# rpm -q 'gpg-pubkey-*' --qf '%{name} -> %{summary}\n'
gpg-pubkey -> gpg(CentOS-6 Key (CentOS 6 Official Signing Key) )
gpg-pubkey -> gpg(EPEL (6) )


開発パッケージをインストール
# yum groupinstall "Development Tools"

その他必要なパッケージをインストール(PostgreSQL用)
# yum install openssl-devel readline-devel zlib-devel curl-devel libyaml-devel ImageMagick ImageMagick-devel ipa-pgothic-fonts
※libyamlとlibyaml-develがEPELレポジトリから取得されました

依存関係により以下のパッケージも一緒にインストールされました

GConf2.i686 0:2.28.0-6.el6
ORBit2.i686 0:2.14.17-3.2.el6_3
bzip2-devel.i686 0:1.0.5-7.el6_0
fontpackages-filesystem.noarch 0:1.41-1.1.el6
freetype-devel.i686 0:2.3.11-14.el6_3.1
ghostscript.i686 0:8.70-15.el6_4.1
ghostscript-devel.i686 0:8.70-15.el6_4.1
ghostscript-fonts.noarch 0:5.50-23.1.el6
jasper-devel.i686 0:1.900.1-15.el6_1.1
keyutils-libs-devel.i686 0:1.4-4.el6
krb5-devel.i686 0:1.10.3-10.el6_4.1
lcms-devel.i686 0:1.19-1.el6
lcms-libs.i686 0:1.19-1.el6
libICE-devel.i686 0:1.0.6-1.el6
libIDL.i686 0:0.8.13-2.1.el6
libSM-devel.i686 0:1.2.1-2.el6
libX11-devel.i686 0:1.5.0-4.el6
libXau-devel.i686 0:1.0.6-4.el6
libXext-devel.i686 0:1.3.1-2.el6
libXfont.i686 0:1.4.5-2.el6
libXt.i686 0:1.1.3-1.el6
libXt-devel.i686 0:1.1.3-1.el6
libcom_err-devel.i686 0:1.41.12-14.el6
libcroco.i686 0:0.6.2-5.el6
libfontenc.i686 0:1.0.5-2.el6
libgsf.i686 0:1.14.15-5.el6
libidn-devel.i686 0:1.18-2.el6
libjpeg-turbo-devel.i686 0:1.2.1-1.el6
librsvg2.i686 0:2.26.0-5.el6_1.1.0.1.centos
libselinux-devel.i686 0:2.0.94-5.3.el6
libsepol-devel.i686 0:2.0.41-4.el6
libtiff-devel.i686 0:3.9.4-9.el6_3
libtool-ltdl.i686 0:2.2.6-15.5.el6
libwmf-lite.i686 0:0.2.8.4-22.el6.centos
libxcb-devel.i686 0:1.8.1-1.el6
libyaml.i686 0:0.1.3-1.el6
ncurses-devel.i686 0:5.7-3.20090208.el6
sgml-common.noarch 0:0.6.3-32.el6
urw-fonts.noarch 0:2.4-10.el6
xorg-x11-font-utils.i686 1:7.2-11.el6
xorg-x11-proto-devel.noarch 0:7.6-25.el6


●Apacheのインストール

ソースからインストールしています。
詳しくはこちらのインストールを参考にして頂ければと思います。

/usr/local/apacheにインストール、UserDirを公開
 

●PostgreSQLのインストール

ソースからインストールしています。
詳しくはこちらのインストールを参考にして頂ければと思います。
/usr/local/pgsqlにインストール、dataはpgsqlの直下
またPL/pgsqlが必要ですが9.0以降はデフォルトでインストールされます。
  
--------------------------------------------------------
DB名:redmine、ユーザ:redmine、パスワード:redmineを作成しておきます。
作業はpostgresユーザで行います。

# su - postgres
$ createuser -d -P redmine
Enter password for new role:パスワード
Enter in again:パスワード(確認)
 
$ createdb redmine --owner=redmine --encoding=UTF8 --template=template0
--------------------------------------------------------
DB作成が終わったらrootに戻りましょう。
$ exit
 

●Ruby 1.9.3のインストール

# cd /usr/local/src
# wget ftp://ftp.ruby-lang.org/pub/ruby/1.9/ruby-1.9.3-p392.tar.gz
# tar zxvf ./ruby-1.9.3-p392.tar.gz
# cd ./ruby-1.9.3-p392
# ./configure
# make
# make install
# ruby -v
ruby 1.9.3p392 (2013-02-22 revision 39386) [i686-linux]

●Rubygems(Rubyに同梱されています)

# gem -v
1.8.23

●bundlerのインストール

# gem install bundler --no-rdoc --no-ri

Fetching: bundler-1.3.4.gem (100%)
Successfully installed bundler-1.3.4
1 gem installed

※--no-rdoc --no-riはドキュメントの不要


●Redmineのインストール


公開ディレクトリ
# useradd redmine ※ユーザを作成するとpublic_htmlが自動的に作成されるようしている
# chmod 755 /home/redmine
# chmod 775 /home/redmine/public_html
 
# cd /usr/local/src
# wget http://rubyforge.org/frs/download.php/76867/redmine-2.3.0.tar.gz
※http://rubyforge.org/frs/?group_id=1850で確認してください。

# tar zxvf redmine-2.3.0.tar.gz 
# mv ./redmine-2.3.0/* /home/redmine/public_html/
 
DBへの接続設定
# cp /home/redmine/public_html/config/database.yml.example /home/redmine/public_html/config/database.yml
 
# vi /home/redmine/public_html/config/database.yml
コメント
#production:
#  adapter: mysql
#  database: redmine
#  host: localhost
#  username: root
#  password:
#  encoding: utf8
追記
production:
  adapter: postgresql
  database: redmine #DB名
  host: localhost #接続先
  username: redmine #DBユーザ
  password: "redmine" #ユーザパスワード
 
Mailの設定
# cp /home/redmine/public_html/config/configuration.yml.example /home/redmine/public_html/config/configuration.yml
 
# vi /home/redmine/public_html/config/configuration.yml
 
ここではlocalhost上のSMTPサーバを利用した例です。
詳しくはRedmine.JP様のページを参考にして頂くとわかりやすいと思います。
 
下の方にproduction:だけが記述されている部分があるのでそこへ追記します。(わかりずらい)

# specific configuration options for production environment
# that overrides the default ones

production:
  email_delivery:
    delivery_method: :smtp
    smtp_settings:
      address: "localhost"
      port: 25
      domain: redmine.example.com

ちなみに自社では自前のメールサーバがありLAN上から参照できます。なのでこんな感じです。
production:
  email_delivery:
    delivery_method: :smtp
    smtp_settings:
      address: "10.1.1.190"
      port: 25
      domain: 自社ドメイン

●Gem pgのインストール

PostgreSQLはソースからインストールしたのでパスを読み込んでから実行する必要がある。

# export PATH=$PATH:/usr/local/pgsql/bin
# gem install pg -- --with-pg-dir=/usr/local/pgsql/ --with-pg-lib=/usr/local/pgsql/lib/ --with-pg-include=/usr/local/pgsql/include/ --no-rdoc --no-ri

Fetching: pg-0.15.0.gem (100%)
Building native extensions.  This could take a while...
Successfully installed pg-0.15.0
1 gem installed
Installing ri documentation for pg-0.15.0...
Installing RDoc documentation for pg-0.15.0...


●その他Gemパッケージのインストール

Redmineで必要なパッケージを一括でインストールします。(Gemfileに記載されている)

2.3よりDBアダプタはdatabase.ymlを参照して適切なアダプタがインストールされるようである。従ってdatabase.ymlには使用しないアダプター名は指定しないようにしておきます。

database.yml.sampleにはproduction:以外の記述があるため注意です。production以外はコメントにするのがいいでしょう。

# cd /home/redmine/public_html/
# bundle install --without development test

Fetching gem metadata from https://rubygems.org/.........
Fetching gem metadata from https://rubygems.org/..
Resolving dependencies...
Using rake (10.0.4) 
Using i18n (0.6.1) 
Using multi_json (1.7.2) 
Using activesupport (3.2.13) 
Using builder (3.0.0) 
Using activemodel (3.2.13) 
Using erubis (2.7.0) 
Using journey (1.0.4) 
Using rack (1.4.5) 
Using rack-cache (1.2) 
Using rack-test (0.6.2) 
Using hike (1.2.1) 
Using tilt (1.3.6) 
Using sprockets (2.2.2) 
Using actionpack (3.2.13) 
Using mime-types (1.21) 
Using polyglot (0.3.3) 
Using treetop (1.4.12) 
Using mail (2.5.3) 
Using actionmailer (3.2.13) 
Using arel (3.0.2) 
Using tzinfo (0.3.37) 
Using activerecord (3.2.13) 
Using activeresource (3.2.13) 
Using bundler (1.3.4) 
Using coderay (1.0.9) 
Using rack-ssl (1.3.3) 
Using json (1.7.7) 
Using rdoc (3.12.2) 
Using thor (0.18.0) 
Using railties (3.2.13) 
Using jquery-rails (2.0.3) 
Using net-ldap (0.3.1) 
Using pg (0.15.0) 
Using ruby-openid (2.1.8) 
Using rack-openid (1.3.1) 
Using rails (3.2.13) 
Using rmagick (2.13.2) 
Your bundle is complete!
Gems in the groups development and test were not installed.
Use `bundle show [gemname]` to see where a bundled gem is installed.


●初期設定およびテーブル作成

# cd /home/redmine/public_html/

# bundle exec rake generate_secret_token
# RAILS_ENV=production bundle exec rake db:migrate

●Passengerのインストール


# gem install passenger --no-rdoc --no-ri

Fetching: fastthread-1.0.7.gem (100%)
Building native extensions.  This could take a while...
Fetching: daemon_controller-1.1.2.gem (100%)
Fetching: passenger-3.0.19.gem (100%)
Successfully installed fastthread-1.0.7
Successfully installed daemon_controller-1.1.2
Successfully installed passenger-3.0.19
3 gems installed


●PassengerのApache用モジュールのインストール

Apacheはソースからインストールしたのでapxs2、path環境変数を設定する必要がある

# export APXS2=/usr/local/apache/bin/apxs
# export PATH=/usr/local/apache/bin:$PATH

# passenger-install-apache2-module

Welcome to the Phusion Passenger Apache 2 module installer, v3.0.19.

This installer will guide you through the entire installation process. It
shouldn't take more than 3 minutes in total.

Here's what you can expect from the installation process:

 1. The Apache 2 module will be installed for you.
 2. You'll learn how to configure Apache.
 3. You'll learn how to deploy a Ruby on Rails application.

Don't worry if anything goes wrong. This installer will advise you on how to
solve any problems.

Press Enter to continue, or Ctrl-C to abort.

 
Enterを押します。


--------------------------------------------

Checking for required software...

 * GNU C++ compiler... found at /usr/bin/g++
 * Curl development headers with SSL support... found
 * OpenSSL development headers... found
 * Zlib development headers... found
 * Ruby development headers... found
 * OpenSSL support for Ruby... found
 * RubyGems... found
 * Rake... found at /usr/local/bin/rake
 * rack... found
 * Apache 2... found at /usr/local/apache/bin/httpd
 * Apache 2 development headers... found at /usr/local/apache/bin/apxs
 * Apache Portable Runtime (APR) development headers... found at /usr/local/apache/bin/apr-1-config
 * Apache Portable Runtime Utility (APU) development headers... found at /usr/local/apache/bin/apu-1-config

--------------------------------------------

Compiling and installing Apache 2 module...

・
・
・
途中でnot foundが出たら解決して再度実行
・
・
・

--------------------------------------------
The Apache 2 module was successfully installed.

Please edit your Apache configuration file, and add these lines:

   LoadModule passenger_module /usr/local/lib/ruby/gems/1.9.1/gems/passenger-3.0.19/ext/apache2/mod_passenger.so
   PassengerRoot /usr/local/lib/ruby/gems/1.9.1/gems/passenger-3.0.19
   PassengerRuby /usr/local/bin/ruby

After you restart Apache, you are ready to deploy any number of Ruby on Rails
applications on Apache, without any further Ruby on Rails-specific
configuration!

Press ENTER to continue.

Enterを押します。


--------------------------------------------
Deploying a Ruby on Rails application: an example

Suppose you have a Rails application in /somewhere. Add a virtual host to your
Apache configuration file and set its DocumentRoot to /somewhere/public:

   
      ServerName www.yourhost.com
      # !!! Be sure to point DocumentRoot to 'public'!
      DocumentRoot /somewhere/public    
     
         # This relaxes Apache security settings.
         AllowOverride all
         # MultiViews must be turned off.
         Options -MultiViews


And that's it! You may also want to check the Users Guide for security and
optimization tips, troubleshooting and other useful information:

  /usr/local/lib/ruby/gems/1.9.1/gems/passenger-3.0.19/doc/Users guide Apache.html

Enjoy Phusion Passenger, a product of Phusion (www.phusion.nl) :-)
https://www.phusionpassenger.com

Phusion Passenger is a trademark of Hongli Lai & Ninh Bui.


●Apache用設定ファイルの新規作成

設定ファイルの書き出し
# passenger-install-apache2-module --snippet > /usr/local/apache/conf/extra/passnger.conf
 
HTTPヘッダ削除、Passengerチューニングをpassnger.confへ(任意)
# vi /usr/local/apache/conf/extra/passnger.conf

LoadModule passenger_module /usr/local/lib/ruby/gems/1.9.1/gems/passenger-3.0.19/ext/apache2/mod_passenger.so
PassengerRoot /usr/local/lib/ruby/gems/1.9.1/gems/passenger-3.0.19
PassengerRuby /usr/local/bin/ruby


追記
# Passengerが追加するHTTPヘッダを削除
Header always unset "X-Powered-By"
Header always unset "X-Rack-Cache"
Header always unset "X-Content-Digest"
Header always unset "X-Runtime"

必要に応じて追記
# Passengerのチューニング設定

※詳しくはhttp://www.modrails.com/documentation/Users%20guide%20Apache.html

 
編集が終わったらhttpd.confでpassnger.confをIncludeさせるようにします。
# vi /usr/local/apache/conf/httpd.conf
最後にでも追記
Include conf/extra/passnger.conf
 
ついでにDocumentRootをRedmineとする(http://IPアドレスで閲覧できる)
DocumentRoot "/home" → "/home/redmine/public_html/public"
 
Apacheのユーザが書き込みできるように設定してApacheを再起動
# chown -R daemon:daemon /home/redmine
# /usr/local/apache/bin/apachectl restart
 
これでIPアドレスによる接続はできると思いますので、初期設定のadmin(パスワード:admin)でログインしてみましょう。
※アクセスできない場合・・・ディレクトリパーミッション、selinuxOFF、iptablesで80ポート開放等をチェックしてみましょう。


ログイン後、上記メニューの「管理」をクリックするとロール、トラッカー、チケットのステータス、ワークフローが設定されていないのでデフォルト設定をロードするよう勧められますのでJapaese(日本語)を選択してデフォルト設定をロードします。


●ログレベル・ログローテーション

# cp /home/redmine/public_html/config/additional_environment.rb.example /home/redmine/public_html/config/additional_environment.rb

ログレベル# vi /home/redmine/public_html/config/additional_environment.rb
config.log_level = :warn

ログファイルのローテーション
1週間ごとにファイルを切り替え12世代(約3ヶ月)履歴を残すようにしています。

# vi /etc/logrotate.d/redmine

/home/redmine/public_html/log/*.log {
  rotate 12
  weekly
  missingok
  notifempty
  copytruncate

  postrotate
      /bin/kill -USR1 `cat /usr/local/apache/logs/httpd.pid 2>/dev/null` 2> /dev/null || true
  endscript

}

 
Apache再起動
# /usr/local/apache/bin/apachectl restart
 

●EPELレポジトリの調整

標準レポジトリのパッケージがEPELレポジトリのパッケージで上書きされないよう基本的に無効化
 
# vi /etc/yum.repos.d/epel.repo
enabled=1のところを=0に変更
 
※yum-plugin-prioritiesをインストールしてEPELレポジトリのプライオリティを下げておくのもよい(以前RPMforgeリポジトリ導入で書いたので参考にして頂ければと思います)


●テーマを追加

Redmine.JP様で公開されている日本語環境でRedmineの画面を見やすくすることを目的としたテーマ「farend fancy」(farend basicの派生テーマ)を使えるようにします。

# cd /home/redmine/public_html

# git clone git://github.com/farend/redmine_theme_farend_fancy.git public/themes/farend_fancy

Redmineの管理画面から「管理」>「設定」>「表示」→テーマを Farend fancyに変更します。保存ボタンを押すのを忘れずに!
 
 
<参考サイト>
本家Redmine:http://www.redmine.org/projects/redmine/wiki/RedmineInstall
Redmine.JP:http://blog.redmine.jp/articles/2_3/installation_centos/

Google検索